As with the British monarchs before her, she lent her name to the period of time when she ruled. This 64-year time frame is known as the Victorian Period.
Most importantly, there is no "Victorian style." This term refers to something that just plain doesn't exist.
Style and
Period are not the same.
Can you imagine if only one style of clothes lasted for 64 years? Style changes faster and faster as time goes on. There were many changes in style during the 64 years of the Victorian Period.
The industrial revolution gave us telephones, telegraph, gas light, and electric light: nearly all of these achievements associated with the Victorian Period. Even paint didn't escape development: The first artificial colors and latex paints were developed in the mid and late 19th century. Technology impacted style just like it does today (think of how much the original iMac influenced the style. of the 1990s) Advances that were novel, fantastical and insanely modern, then, look old-fashioned to some now. In ten years, you'll feel the same way about those pants you're wearing.
Victorian Styles
To give you a quick primer on the many styles of the Victorian Period, let's look at a few chairs. Chairs are great. They always embody almost everything about the nuances of a particular style. In every style, era, or period, chairs were and are a necessary part of daily life. You can find a chair to represent even the most fleeting sub-styles.
Here are a handful, in rough chronological order, with some of the technology that made that style possible. I hope that you'll see that everyone of these styles is really, really different from the others—crazy different. But they are all "Victorian."
Gothic Revival
The Gothic Revival, one of many revival styles, looked back to the original Gothic (medieval period) style and displayed Gothic arches, trefoils and clean, geometrically patterned fabrics. Colors, too were influenced by the original style when primary, flat colors, like blue, yellow and emerald green, were used in fabrics, stained glass and, most notably, in church decoration. Often, modern viewers of this style think that everything in a Gothic Revival style was in a church. The Gothic Revival was commonly used for public buildings of all sorts and often in homes.
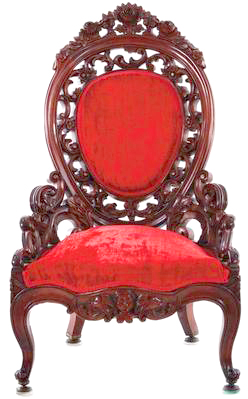
Rococco Revival
The Rococo Revival, like the earlier Gothic Revival, looked to the historic Rococo period (a short-lived period immediately after the Baroque Era) and it's associated florid shapes. Straight lines were banished and natural curves are used to produce visually delicate furniture. Strongly associated with the south, this style was common throughout the country and often was used in Italianate style homes, contrasting with the geometry of this Italian-Renaissance-inspired style. Laminated woods, a technological development tied to the early part of the 19th century, enabled those huge swaths of wood for the fully carved and curved backs of this feminine furniture. Fabrics were sumptuous and red is commonly associated with this style. John Henry Belter is the most well-known designer of this style.

Renaissance Revival
This whollly American style grew out of observed Renaissance era motifs and French furniture design. Architectural and impressive, it was most popular in the industrial north where Victorian era robber barrons put their newly earned wealth on display. Impressive, richly colored fabrics in silk and velvet were popular. Deep button tufting was revived from the Rococo Revival to adorn these often over the top pieces. Often associated with the late-Italianate and Second Empire architectural styles, the furniture and buildings shared common massing and motifs. John Jelliff and Thomas Brooks were popular designers working in this style.

Neo Grec
Sometimes thought of as a sub-style to Renaissance Revival, this was a short-lived high-style movement that influenced elite brownstone townhouses in New York and the furniture that wealthy tastemakers chose to place within them. Sometimes referred to as New Greek or incorrectly as Greek Revival (a wholly different period some 20-30 years earlier), inspiration for this style was derived from Ancient Greek and Roman sources such as anthemion, greek key and acanthus motifs, as well as Ancient Roman and Japanese sources. Polychromy, coloring the furniture in multi-colored finishes, was popular, as was ebonizing, a finishing technique meant to imitate ebony wood or Japanese lacquered items. Leon Marcotte created some outstanding furniture in the Neo Grec style.

Neo Gothic
Even revival styles were revived. The Neo Gothic style is sometimes called Eastlake since Charles Eastlake, the Martha Stewart of the late 19th century, espoused this simple, functional and Medieval-inspired style. Kimmel and Cabus worked in this style and their furniture is highly desirable now. More simplistic and without the "churchy" association of other Gothic styles, this style proposed to authentically reproduce the furniture and architecture of the Medieval Period and often includes coloring by fuming and a simple finish of wax.

Colonial Revival

Yes, indeed, the Colonial Revival was a Victorian Period style. Begun about the time of the United States' Centennial in 1876, this style has had many variations of it's own, all looking back with varying degrees of authenticity to various aspects of Colonial America for inspiration. It continues, uninterrupted, to this day.
Louis Revivals
To some, this style is closely associated with the Colonial Revival, since the variants are still popular with interior designers, today. Imitating the various French styles associated with a line of Louis monarchs, this style uses feminine forms, pale fabrics and a great deal of gold and white. Typically used in the parlors of homes of Victorian "old money" families, such as the Vanderbilts and Astors, this style is always an indication of conservative wealth.

Innovation Style
Capitalizing entirely on new technologies developed during the Industrial Revolution, this style can be super modern in appearance, even after 100+ years. As machinery made possible new treatments to shape wood and metal, designers showcased these technologies in furniture design, such as this Hunzinger-designed rocker that doesn't fold, but looks as if it does. The "upholstery" is novel, too, made up of flat wires that are wrapped in brightly colored fabrics and meant to be shown. The rocker even has groves cut into the wood that are colored to match the fabric wrapped wires. The bent-wood armchair is by the Viennese furniture maker, Thonet, who steam-bent wood to create curvaceous furniture that feels like summer. Hunzinger and Thonet both hold many patents on their furniture technology.

Cottage
This style came about in the 1870s but became super popular in the late 1890's and into the 20th century. It is often simple in design and commonly uses Renaissance Revival massing with faux graining and scene paintings to decorate the simple pine furniture, carrying on ancient European traditions of decorating cheap furniture to appear more expensive. It was popular with normal Victorian people. Also included are wicker pieces, even though some wicker was produced within the styles listed above (yeah, its confusing, I know). A wicker chair by Heywood Wakefield is shown. Cottage furniture was often used in bedrooms and sunrooms, or a piece or two added to a more formal room to show visitors how cozy the family was. After the turn of the 20th century wicker pieces moved outdoors and the painted pine pieces all but disappeared.


 We weren't able to afford a new floor (rip out the old tile, put in new) so we kept the not too threatening white and maroon tile floor we inherited. I'm not a fan of the particular shade of maroon—very 1980s, so to decrease its appearance I added a good bit of dark walnut wood items and am using only deep amber (brown) glass for storing toiletries (soap, mouthwash, cough drops, etc.). This has a net affect of making the maroon of the floor appear to be purposeful, more of a dark brown and less offensive/dated.


