Friday, December 25, 2015

Bath Remodel (part 3 of 4)

This is part 3 of the first floor bathroom remodel.

See previous entries: Part 1; Part 2.

Since the last entry the bathroom has been painted on one side only. The old sink and toilet were cleaned/refurbished and were installed along with new water shut-off valves and bendable, rather than corrugated, water supply lines. The bendable smooth water supplies are more period correct than the flexible braided type found at big box stores.

The water supplies and shut off valves came form Signature Hardware and repeat the cross-handles found on the shower hardware.

Before ... ugh

After ... sans wall paper - yet to be installed.

Why didn't you just paint the whole room and then install the fixtures?  


Really, if I was only concerned with keeping the room on track, I would have painted all at once. We had to make this first floor bathroom usable for a holiday party. this limitation gave me a chance to show off the unfinished side's structure. I think that it's educational for guests to see and ask about the "during" phase of home restoration. They often believe that home restoration is mystical or too hard and in this way can see how simple and straightforward it can be. Maybe, hopefully, they will even rethink tearing out old historical features in favor of anything new (and probably with questionable taste.)

Below are a couple of photos of the finished paint, just before installing the fixtures.

The paint color, by-the-way, is a pale warm grey. It's very period and was used often in service areas. Sometimes referred to as drab (light drab in this case) it is utilitarian and easy to live with. It is the color of brushed nickel that has aged and obtained the smooth golden patina of 150 years. It is the color of dried straw that was left in the sun a bit too long. It is lovely and antique and modern all at the same time. It looks stunning with the pale pink ceiling and will carry into the adjacent hall and kitchen very well when we rework those areas.


The top part of the wall is primer.


that bit of white paper towel is because we have to repair a leaking nipple connection for the toilet inlet line.

This corner includes a new double outlet where a 1940s electric heater used to be. We couldn't figure out a good spot to mount the toilet paper holder so we got a free-standing one.

In order to save a few dollars we didnt tear out the floor - plus its appropriate to the era. I don't care for the maroon tiles, so to lessen the impact I am adding dark walnut things to the room - a couple of mirror frames and a cool toilet seat I found.

Reused the old sink with a new faucet. 

Monday, December 14, 2015

Bath Remodel (part 2 of 4)

This is part 2 of the first floor bathroom remodel.

See previous entry: Part 1

In part 1, I left off where the shower had been retiled and new faucet and shower head installed. Since then the walls have been patched, electrical repaired and repurposed and lower walls clad in bead board and cap and baseboard trim.

General overview of the room with woodwork in place, but before any cleaning and painting. Even so, it looks pretty darned good since its last inception.

First sections of bead board go up. No, its not real beaded board that is hung similar to T&G floors, but it'll do. The outlet is where a terrible old huge heater was circa 1940's. Reused the electric for the outlets, which the room lacked.


Same as above but with baseboard and cap in place. note notched cap for the wall switch - easier to notch the wood than to move electrical.

The Sink Wall ready for caulk and paint. The floor still needs to be scrubbed and the scuffs on the wall removed before painting.
More electrical excitement: This is the recess behind where the old medicine cabinet was.
The previous cabinet was a chromed 1940's behemoth that looked more like a Chrysler than a medicine cabinet.
It had 2 lights integral to the structure that were fed by a single electrical line to the top of the cabinet.
That line was split into 2 for some 1880's Bradley and Hubbard sconces that I will add to either side of a custom built medicine cabinet with an antique walnut framed mirror.

Tuesday, November 24, 2015

Now You See It ... Now It's a Bathroom ?

Being socially upwardly mobile and influential was pretty darned important to some Victorian era folks. Anyone with any level of aspiration to success needed to have a full tool belt for those sticky society events and stuffy silver-drenched dinners. The family who built my home must have been "those kind of people." Off the kitchen was a fairly large butlers pantry - about 12 x 5 - with shelves that stretched floor to ceiling across at least 2 walls. The broad boards of those shelves must have groaned under the weight of stacks of dinner plates, luncheon plates, salad plates, soup plates, tea cups, coffee cups, after-dinner cups, saucers of various sizes, sherbets, crystal in 25 different shapes for at least 24 people, and silver. Silver dinner forks, place spoons, salad forks, oyster forks, after-dinner spoons, fruit knives and matching tiny fruit forks, grapefruit spoons, ice cream spoons (with tiny teeth to stab those cold-frozen chunks), seafood forks, soup and bullion spoons, tea spoons, soup ladles, meat forks, asparagus servers, pancake servers ... you get the picture.

And the dining room, where the art of the dinner took place, was, and still is, substantial without being cavernous: The perfect canvas to lay out this implements and soar skyward into high-society.

In about 1947, though, while the prosperous Hack family lived in the house, the earnest butlers pantry was demolished and a full bathroom was installed into the space. Plastic tile was chosen to grace the walls and a cinderella tub was dropped into a space that was made smaller with the addition of a wall, which also hid the vent stack for the plumbing (and preserved some superb evidence of the room's original purpose.)

This Autumn we decided to undo the band-aid fixes that this bathroom had seen over the past 60 years and install something more period appropriate to the house, albeit, still not a butlers pantry.

What follows is a pictorial story about making the bathroom once again sound and safe, as well as pleasing and more period correct. Sure, we could have gone with the 40's style, since that is correct for when the room became a bath, but we did that in the second floor and we really wanted something that looked and felt older, more in keeping with the formal rooms where guests will gather for some new century social ladder climbing.

(notes: thanks to Repko Renovations for the excellent tub surround build. This is part 1 of a few - You'll know when it ends, ha ha)

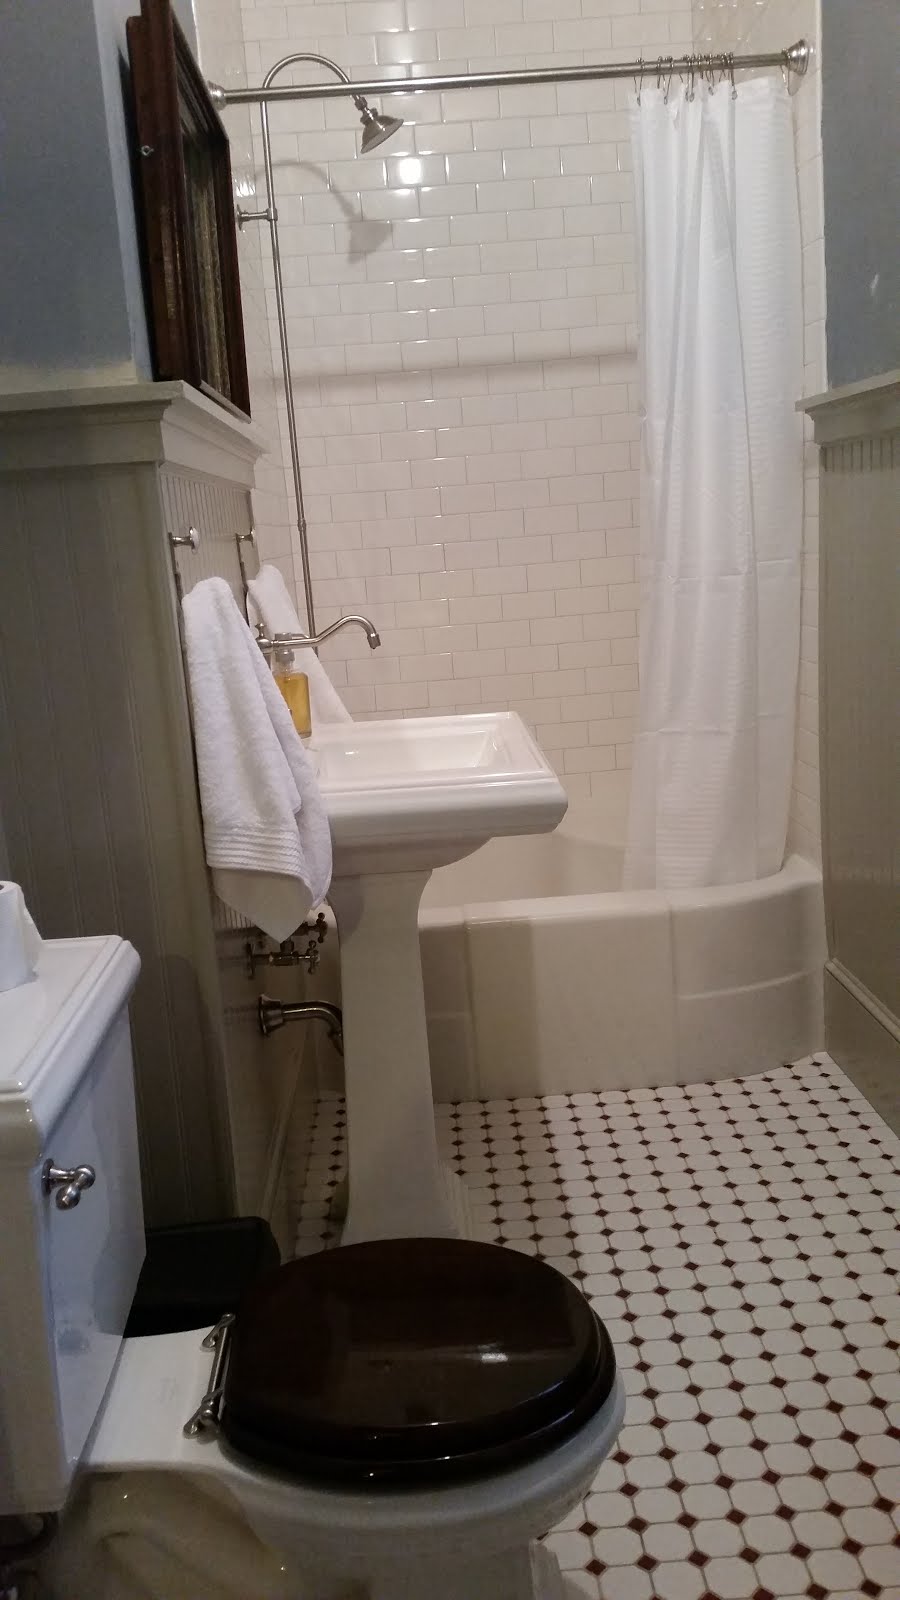
Here's the best before photo. Notice that the tile surround above the tub is white ceramic. Not sure when this was changed from the plastic or if it always was ceramic. It's a mess, though, with cracks, missing grout, and a strange indent that surrounds the faucet. The burgundy wallpaper ends where a drop ceiling hung. We gained a foot and a half of height by taking that thing out and repairing the ceiling.

With the old plaster removed you can see the structure of the house's exterior walls. The house is built of solid brick with stone veneer. In some places on exterior walls there is lath and plaster, while in others the plaster is placed directly onto the brick, as you can see here. The tan colored square pattern is adhesive residue from the plastic tiles. You'll see it more thought these photos.

Behind the "new wall" which extends into the room a foot, you can see untouched yellow oil paint from the original pantry. If you look carefully, the dark outlines of the lower cabinets, still with the wall paper that lined the interiors (the grid like pattern is a cream and light blue wallpaper). You can even see on the edge of the lower cabinet the ogee moldings that were placed under the counter lip. Above are plain areas where the pantry shelves were hung.

This is the edge of the shelving unit that sat on the cabinet, shown above. The fancy molding under the top of the shelves (look for my purple outline to help you see the shape better) is visible. There were 4 shelves from counter to ceiling that could be seen (but didn't make it into this photo).

New cement board in place over the bricks and lath.  It was about this time when I really really really thought hard about making this room, once again, a pantry ... really hard ...

Red Guard was added to prevent water egress from the tub area. Red Guard is a liquid vinyl that can be painted onto a surface and dries to create a waterproof membrane. It also consolidates minor cracks in old plaster. The back wall of classic subway tiles from tub to ceiling went up really fast. 

On the right side there are 3 horizontal, radiating dark lines - those are shadows of the original shelves. they stretched about 12 feet along that wall, and about 5 feet across the back wall - tons of shelves.

Ahh h h h ....  Tub surround in place and grouted. New shower faucet hung and water tight (thanks John). New ceiling visible near the top.


Close up - the whole thing cleaned up pretty well.

Requisite fancy artsy-shmartsy blog photo

We opted to use an exposed shower pipe, not just because it looks very cool and period, but because I wanted as few potential plumbing problems hidden behind the wall as possible. While looking for new plumbing fixtures, I accidentally became obsessed with Signature Hardware, located in Cincinnati, where I bought all of the new plumbing fixtures for this bath.

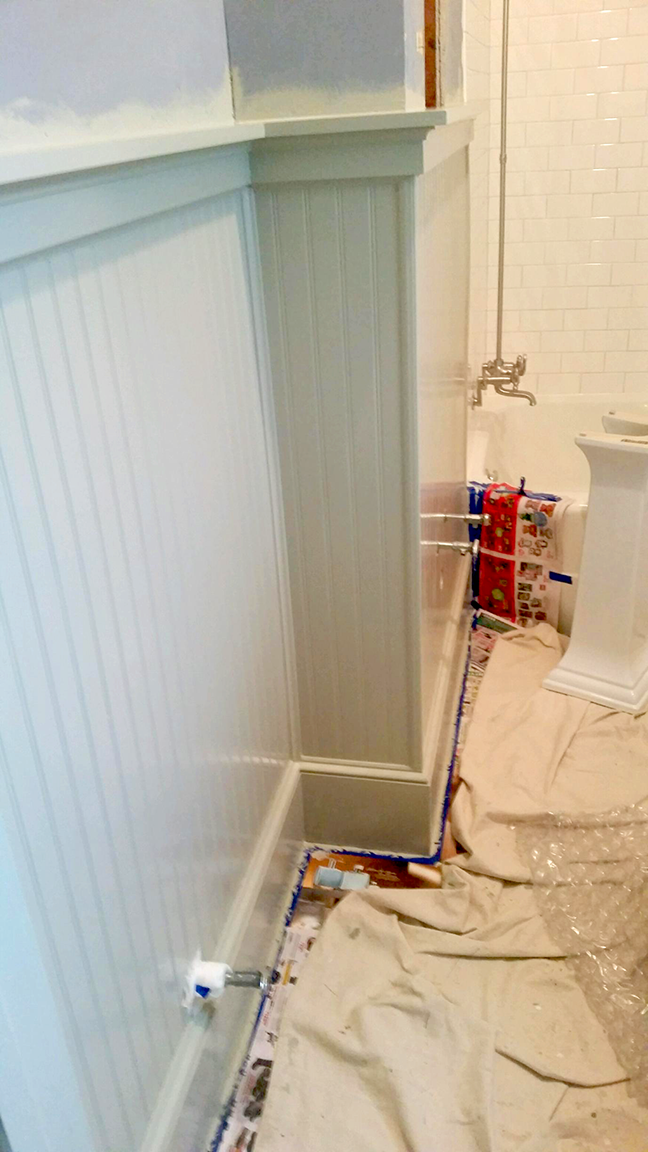
I oil-primed the old plaster so that the Anaglypta wall covering were using will adhere better, and give a little extra protection to the walls. primed the ceiling twice, sanded between and one final sanding. this is the first coat of high-gloss paint. The color is Farrow & Ball Setting Plaster. It is, by far, the most perfect ceiling color ever: a dusky, fleshy, dull pink that makes everything look better. On a ceiling it dissolves away and makes the ceiling feel taller, vaporous, infinite. I can't recommend it enough. There will be beaded board on the lower part of the walls. All will be painted old white and a gentle warm nickel color. 

Monday, August 17, 2015

Earning the Urns


While we were at a huge antique show in Northern Kentucky back in about 2005 we became smitten with a pair of cast iron urns. Thinking they were a bargain, we hauled the 200 pound pair to the car and drove them back home. Later, we learned that they were more than three times the "going" price (rotten sellers and uninformed buyers) for similar urns.

We nonetheless wanted to fill them to overflowing with plants and set them out front on each side of the porch stairs.

Since we lived in a less than stellar neighborhood (all the best houses are in rough neighborhoods it seems) we developed a hidden way to secure them to the ground so no one would run off with a 100 pound urn in the middle of the night. There they sat for about a year -- until we moved.

We unhitched the urns from their concrete bases and moved them to the new (old) house's 3-car garage. Which is just where they sat until we moved again and put them into the newer (old) houses garage.

Well, since we had the house painted a couple weeks ago, and I have been working on restoring the lattice panels of under the porch, it was a perfect time to add yet another job to the "honey do" list.

Last week I installed the 2 brick-and-cement bases for the urns while they were being cleaned, scraped, sanded and painted from flat, lifeless ivory, to high gloss deepest black-green. This weekend the final coats of paint went on and the cement bases were cured and ready to hold the urns in place. A few "heave-ho's" and they were squared up and secured in place. Even the plants were readied earlier so within a few minutes the urns were overflowing with ivy and "elephant ears."

They look great and we hope they stay around for years and years and years to come.


Fresh cement curing under a few grocery bags to keep it wet.
The bases were sized so the cement is not visible.

Monday, August 3, 2015

Has it really been a whole year ???

I have a lot of catching up to do ... It's been a few days beyond a year since I last updated. Surely I haven't been doing nothing. a quick list:


  • Rotted back porch post bases have been removed and restored.
  • A new fir T&G back porch floor has been installed to replace the rotted pine one. I need to sand and recoat with one final coat of spar varnish and it will be done for the next couple of years.)
  • The old wrought iron fence we've been dragging around for 12 years finally has a permanent home in the front yard.
  • Perennial gardens are dug and partially planted after regrading the soil (removing about 8 inches of bulked up earth.)
  • Lattice panels under the porch have been dug out (see above) and removed to be restored and reinstalled.
  • Aluminum soffit and fascia (probably dating to 1970's) has been removed, re-exposing the original rafter tails and adding more charm and style to the house.
  • The whole exterior (save a few window surrounds) has been scraped and repainted.
  • The original terra cotta tile floor on the front porch has been cleaned and now I am removing paint drips (see above.)
  • The Japanese garden in the back yard is 90% in place. I am still collecting rocks for the dry creek and a few final plants need to be purchased when the coffers refill.
  • The front door, which was stripped and left unfinished when we purchased the house, received a dozen coats of shellack in the past few weeks to begin repairing the funky "stripped wood" color. Final coats of spar varnish will complete it once the color is corrected with the shellack.
  • a few trees have been removed from the side of the house. These were improperly "topped" years back and would never recover. Soon well look for some new evergreen shrubs to plant in their place.

... and following are a few photos of the processes so far.

Crummy aluminum soffit in place

Soffit removed. Band molding replaced (with new) and all repainted.

Installing the iron and stone fence.

New fir tongue and groove flooring, partially finished prior to install, with new column bases in place.

The Challenge: Regrade this mess (about 8 inches of lattice frame is buried.
After regrading the soil and adding a few pants.

Old fashioned scrubbing the terra cotta porch floor tiles.

Home After